Sunday, September 13, 2015

Light at the end of the tunnel

I'm coming up on almost 2 years working on this project. Granted, it's not been full time, but some days and weekends it has felt like it was full time. I estimate I have around 1500 hours into it. At any rate, Friday morning I received a shipment of my last few pieces of okume, and set about putting the decks in place.

I've been looking forward to this part of the build for some time. From what I could tell, it did not look particularly difficult, and that proved to be right. I used the large 4x8' pieces of cardboard to create templates for the various parts of the deck, cut those out with an exacto knife and used the template to trace the outline onto the sheets of 6mm ply. I made the edges a little proud of the line with the intention of trimming back once the glue had set.  All the cuts were made and glued up by Saturday evening, and this morning I attacked the boat with an edge router and my palm sander. I'm pretty pleased with the results.

What's left? I still have to make my boom and finish my bumkin. I need to install the coaming and cap rails. I need to carve out some wooden horn cleats. I need to do some sanding and finishing. I need to splice my lines and get the rigging ready, and bend on my sails. I figure maybe another 3 or 4 weeks depending on how much time I can dedicate during the week.

Anyway...some of the latest pictures from this weekend's work.

Slightly oversized. Used a jury-rigged marking gauge to lay out the line for the screws. Back filled with epoxy putty 
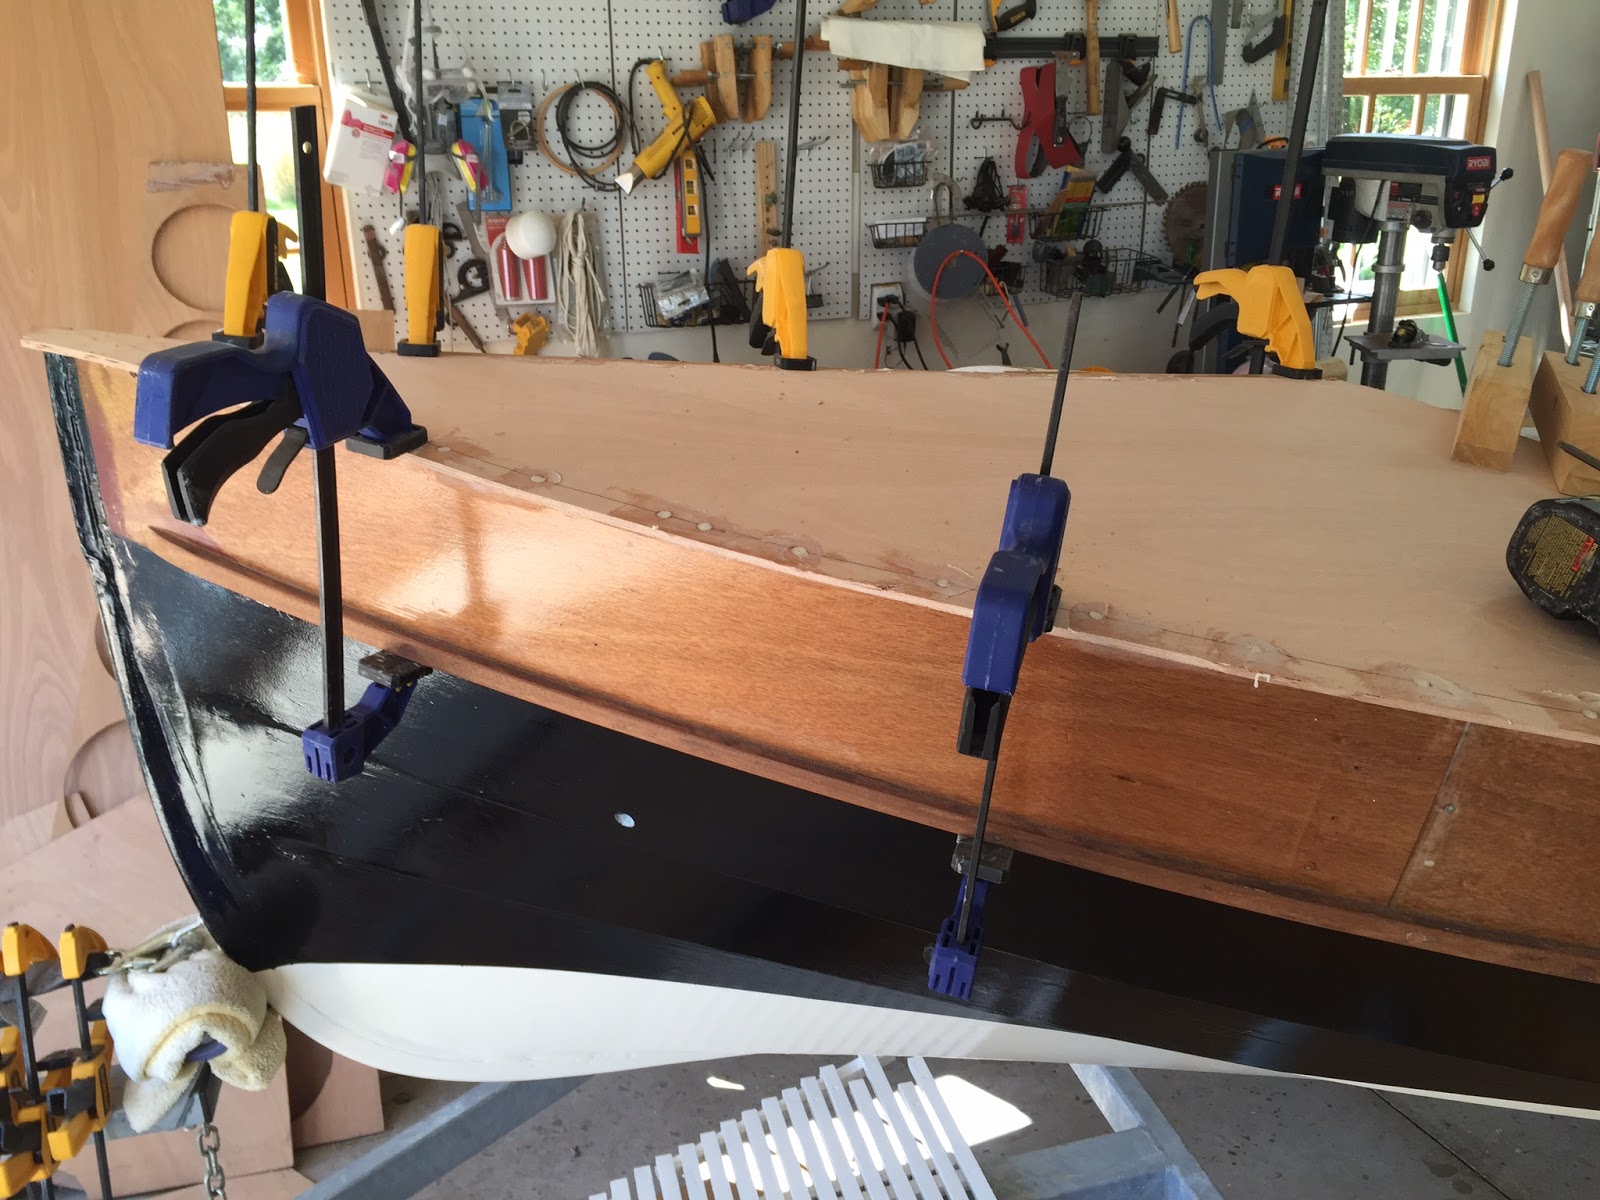
Nice to have different kinds of clamps. I really like the Irwin and DeWalt quick clamps. The large wooden clamps toward the bow were really handy for holding the deck down to the stringer as it approached the king-plank. In a later picture you can see I'm going with a rounded cockpit front. 

The mahogany lower rub-rail was helpful to temporarily clamp down the deck. There's quite a bit of curve at this part of the boat. Some slight compound curving as well toward the forward coaming area. 

By Friday night I had trimmed most of the remaining decks. 

Everything nicely cleaned up. 

I have yet to finish trimming the forward coaming edge. 

Nice view from the tip of the bowsprit. The anchor well is roughed in. I need to trim that a little better so that it matches the angle where the bowsprit tapers back to the anchor bitt/samson post. 

Starboard quarter view as the sun was setting today. 

The chain plates came through without any fuss. Used my trusty multi tool to cut a small slot. 

The hole for the main mast was cut with my palm router and a straight bit with a bottom bearing. I'll probably need to take a file to it to open it just a bit more, as I plan to leather that hole to avoid chafe on the mast. Down below, the hole going from the seat to the mast step is coated in the black rubber deck caulking. You can just see that in the next photo.


There she is from the port side. Looks like a right little ship with her new deck on. 

Parting shot after cleaning up the shop. You can see that I've varnished the transom and (mostly) attached the rudder. 


Tuesday, September 8, 2015

Laid decks

Beside the fact that it was almost 90 degrees out and extremely high humidity this weekend, I figured it would be a good time to get my oak decks caulked. So I spent about half of the weekend masking and caulking.

I ordered up a box of TDS caulk (Teak Decking Systems). I wanted to go with sikaflex, but there are so many varieties and I couldn't tell which sku was the kind best suited to my application. So in the end I went with TDS based on some favorable online reviews. 

I had a lazy man's idea to just squirt the stuff into the cracks and then clean up with a spatula. Boy was that a disaster. After only one seam caulked I had made such a mess that I envisioned spending the next 12 months simply sanding off all the excess. 

So instead, I invested in 4 rolls of blu masking tape and spent five hours or so on Saturday taping each and every seam. Sunday morning I proceeded to squirt the black goo. Let me just say that stuff is an ungodly mess to work with. It sticks to every single little thing it comes in contact with. There's also a lot of waste in the application but I'm not sure how it could have been different.

If you've never used this material, pay close attention to the recommended application method. It will save you time and effort of redoing work later. What I mean specifically is that you can't simply take the excess squeeze out of a caulking run and slather it into the next crack. Doing this tends to trap air under the compound resulting in poorly adhered seams once the compound cures. I thought I would try to save material by pushing the excess in, and consequently spent a few hours cutting out poorly laid caulk seams and re-doing them. The correct process is to lay a thick bead into the gap and let it crown a little bit over the top edge. Then drag a spatula or putty knife across the top at an angle in order to push the compound completely into the bottom and sides of the gap. This will result in a LOT of waste material. But as I said above, I'm not sure how it could have been done differently. 

I ended up using 9 tubes of 10 oz each to fill all the seams. In the process of pulling up the masking tape, I discovered a few seams that I will do over again, so by the end of the project we could probably call it 10 tubes.

Some people said to pull up the masking tape while the compound is still setting up. I tried this with some good success the tape came up easily enough. I got tired though and went to bed before the job was finished. I woke up early this morning worried sick that the remaining masking tape would be attached forever to the deck, but it turned out to be almost as easy to pull up dry as when it was still tacky...albeit with fewer collateral black smudges. 

I used some furniture scrapers to clean up some of the overspill and to smooth the decks a bit. I'll come back with a sander to finish the job later this week when it's had some time to cure properly. Anyway...some pix follow. 

Next week: top decks and coamings. Almost done. :)


Masked seat tops. Rather than use a razor to cut through the gaps, I carefully laid 1" tape on either side of each plank. A 1 7/8" plank means the tape overlaps a little in the middle which is good for masking AND for removing the tape later. 


Here you can see tape partially removed after the caulk has been applied. 
I tried to follow Barrett Faneuf's method for "fancy cuts" It turned out ok. Once sanded, I think this will look really nice. This is the rear starboard quarter where it intersects the transom.
This shot gives you a preview of the pre-sanded pre-oiled finished product.  I used a set of cheap furniture scrapers to "shave" off some of the flashing. The scrapers also make short work of smoothing out the oak planks. Once I have the rest of the masking removed and scraped, I'll finish up with some fine-grit sand paper and then put an oiled finish on it. Can't wait to see how it looks!


Saturday, August 29, 2015

A photo update...

So as I said in my last posting, I've been spending tons of time out the shop trying to get this project finished before the cold weather sets in here in Wisconsin again. So I haven't spent any time posting or writing.

I have taken a few photos that will give you an indication of what I've been up to and where I'm currently at. This posting will bring you up to date through today, so here goes:

Inside is primed and seat tops are roughed in. Rudder cheeks are clamped on to see how they'll look. Bumpkin is snugged in. 

Tiller is fitted for looks. It's been epoxied but not yet sanded or varnished.  Here you can see the top of the (folded) mast. I will have to make some kind of gallows for my spars for when this boat actually starts to travel.

'
Shaping the gaff jaws
Gaff glued and screwed and 'poxied. Needs some sanding and finishing work.

Different view of the gaff jaws.


Made a hollow bumkin. Probably didn't need to be...but I had some spare lumber from the mainmast .
The new samson post. Much nicer size/shape. 

Laminating the mizzen
Once the seat tops were set in place, I found some 8/4 quarter sawn rough white oak for a couple hundred bucks and planed and ripped it into planking for a proper "yacht laid deck". Planks are 1 7/8" x 5/16". The edge covering boards are a bit wider 2 1/2" I think and abetted out so that they cover the edges of the ply sub-seats. 

I used Sika flexible contractors adhesive to put bed the planks and covering boards. It should allow the wood to move a bit, but seems to have pretty exceptional hold. 

3/16" spacers keep everything (pretty much) lined up. 


Chain plate for the mainmast shrouds. I put a hardwood backer inside the sheer plank and through bolted it with stainless 1/4" bolts. I still have to screw the top bolt, but I want to see how/if the top rub-rail will be affected. Probably will countersink the bolt and cover it from the outside. In any case, it should prove to be sturdy enough.
Decks are sanded and covered up as I begin the interior painting process.
Figured I should paint before I put the seam caulking in.

Kind of a dark photo, but you can see the paint scheme for my little "Puffin". Going with white bottom paint, black topsides, and a bright sheer strake with white interior trimmed with oiled decks and bright spars. 


Sitting on her trailer...

OK...so I'm finally getting around to posting this only about 4 months past the day I originally wrote it and saved it as a draft. I'm more caught up in actual building than writing about it. But time for a catch up.

Spring is finally here. But days alternate between 40 and 80 degrees and sunshine and rain from moment to moment. We're building a new home, and our current one is up for sale. So my wife is demanding that I keep the "shop" nice and clean so as not to offend prospective buyers. Seems like I spend as much time cleaning up as I do actually building, when I get to spend any time at all!

Anyway, here are a few shots of recent progress. I got several coats of epoxy on the outside of the hull and it's as sanded and smooth as it's going to get. We won't call it a museum quality finish, but 'twill serve. My son and a neighbor helped to lift her off her cradle and place her onto her trailer. I was tired of looking at her upside down. Nice to see her right side up again, and I figured it would be easier to attach the lower sheer strake rub rails from a higher position. Got the rub rails installed which was fun. Nice when planing and sanding and gluing all work out the way you want them to with no major fuss or "do overs".


Spanish Cedar lower rub-rail. Left over material from when I built my CLC Tandem Wherry. 

Rails are glued and screwed. The bungs turned out nice. You really have to look close to even see them.

Got the bow-u-bolt installed too. I was worried about not being able to drive a 12" drill bit straight through the false stem and inside stem without the bit wandering off course. Ended up being easy as pie. So that was encouraging.

There's the bow-eye. You can also see a dry-fitting of the bowsprit.  I have the heel snugged into my samson post. That post is temporary, though. It's way too big for the size of this boat. I'll make a new one about half the size.


I also got the king plank roughed in. I need finish shaping the main mast before I position and cut the mast partner hole in the king plank and trim it to size. But she fits pretty well into the bow of the boat and I managed a pretty clean job of mortising the holes in both the king plank and the samson post for the butt end of the bowsprit. Fun work chopping a mortise by hand. Makes you really feel like you're doing serious woodwork. :)

Mainmast, kingplank, samson post, and bowsprit. Should make for a pretty sturdy combination


Next step is to flip her back over and paint/finish the outside of the hull. Maybe this weekend?


Monday, April 27, 2015

A hinged main mast


I saw an article in Woodenboat magazine (WB #237, March-April 2014) about a year ago describing a simple but elegant mast hinge. I figured that a hinged mast would be easier to manage and set up than standing on a boat on a trailer and manhandling a free-footed 15' spar with all the lines and rigging doodads. So I copied the article and put it on my desk for future reference. This past weekend, I made the mast and hinge. 

For two reasons, I decided to forgo JW's hollow mast design and try out the birds-mouth method. First, I thought having a lighter mast would be good for boat-handling (less weight aloft), and for  ease of rigging-from-the-trailer. Second, I wanted to gain woodworking experience by using the birds mouth technique. 

I bought a nice piece of 16' sitka spruce, and managed to completely destroy it. I had purchased a birds mouth router bit from one of the woodworking mags, but I don't have a router table. So I improvised one. The bit sort of worked...but my table didn't help, and I managed to mangle all my staves beyond usefulness. Not wanting to shell out another $200 for a plank of sitka, I figured I could use prime clear pine. I bought some 8' lengths from Home Depot, and used a rented contractor table saw to make the 45-degree angle cuts after scarfing them together to make 16' lengths. The table saw did a much better job. 

(Note: I keep thinking that a router has the potential to be such an amazing tool. But that thing scares the be-jeezus out of me. The bits are wicked sharp—I sliced my hand wide open and deep just grazing one of them while reaching for another tool! And much as I try, I find that the router has an amazing ability to instantly destroy a perfectly good piece of wood if you're not extremely careful. So for the moment, I use it only when absolutely necessary. 

Anyway. If you want to try making a birds mouth mast, there are some great calculators from Duckworks that can give you all the dimensions you'll possibly need. Here are some pix from my efforts:

Upper mast all glued up. I used cheap hose clamps about 1 per foot of mast length to hold it all together.  The very top and very bottom of the mast have an octagonal solid ash plug. The lower one to hold the hinge parts, the upper one for a solid place to attach the peak halyard block. There's also a solid plug about 18" down from the top where the hounds will be. 


End view of the birds mouth mast. I'm pleased that my math and geometry (never my best subjects!) worked out right and that my cuts were sufficiently accurate to give a nice fit. My dad was kind enough to let me know that a good carpenter would never leave his plane edge down on his bench. Point taken.
Gluing up the stub-mast. This I'm starting square. I'll shape it to an octagon at the deck-level, and then round it where the hinge parts meet.

Here's the bottom of the stub-mast. The square bit will fit into the mast-step installed in the boat a few months ago. 

Making the mast round. Not the plane on it's side ;P    Nothing more gratifying or better smelling than a nice pile of wood-shavings. I took somebody's advice and made sure all the staves grain was going in the same direction, which made the planing a joy. No tear-outs. In this photo, you can see the two stainless hinge "cheeks" with a hardwood spacer between them.

Here's a dry-fit of the hinge assembly. The entire hinge is 18" long.  The bolts are 1/2" stainless, counter sunk into the mast, except for the "lock" pin for ease of access. The stub-mast has not been shaped yet. 

different view of the hinge

Flipped and 'Glassed...


Amazingly, I was able to get her flipped over by myself and using the leverage of a couple of my little "Burro Brand" knock-down sawhorses, was able to position her bottom up for some detailing on the outside. Once you've spent months looking at a boat from a certain angle (on the jig), it's very strange to turn her over. She looks very different and it takes some getting used to.

As I search through the photos, I realize I didn't take any pictures of the fiberglass operation. At any rate. It proceeded quickly and without fuss. I enjoy fiberglassing. There is something very satisfying about smoothing all the fabric and wetting it out and squeegeeing the resin to all the right places. I did a pretty clean job of it, and then proceeded to putting the skeg together. 

I laminated the skeg from various pieces of white oak and mahogany I had laying around.

Here's my improvised jig for compressing the sternmost laminations. It's useful to have a collection of bar clamps. The plastic sheeting covers it so that the compression blocks don't get glued to the skeg. 

After the glue sets up, you can see the various laminations. In this photo, you can also see the difference in color between the naked plywood planks and the area that's been fiberglassed. 


Here's some detail of the centerboard trunk bits. I tried to give them a graceful curve both going in and exiting the trunk. The screw holes will be filled later. 


View of the shaped skeg toward the stern


At this point of the build I went into a sort of depression. There were several things happening. One, I was berating myself about the quality of my workmanship, which I consider to be substandard. Friends look at what I've done and are all suitably impressed. But I look around at what other builders have done, and I'm blown away by their skill and accuracy. So there was that whole thing happening in my head. 

The other thing was the false stem. Early on, I had read where somebody recommended tracing the stem frame onto a piece of ply so that you could bend the false stem to that curve later. I did that. And I laminated up a beautiful white oak false stem. It bent to the curve very nicely. But when I went to put it onto the boat, the curve was wrong and there was a yawning gap between the forefoot of the boat and the inner edge of my false stem. To beat all, the oak laminations and epoxy were SO hard, I couldn't get the darn thing to flex one little bit. So I had to scrap it.

What followed was about 2 months of trying and trying to laminate directly onto my hull. It turned out I was making my laminations too thick and they were snapping right at the tightest curve. I tried different methods, of making a go of it, but every time, right when I would get to the critical moment, the lams would snap.

Finally, I planed down several more staves of white oak to about 3 or 4mm thickness and managed to glue them up in place using nails and sacrificial ply to hold it all to the hull. Sheesh. My least favorite part of the build so far.